Sunday, June 24, 2007

Erachi Puttu – Steamed Rice Flour cakes layered with spicy meat mixture- A Kerala Breakfast.


“Ohh….Again the same old stuff? Quite bored with it…..why not something else?” Perhaps, this is something most of the Malayalees, brought up in Kerala, have asked their mothers or grand mothers or sometimes fathers too, at the breakfast table when a plate of Puttu (Steamed rice flour cakes) has been served and perhaps, something that is still being asked, if the cereal generation is yet to be full-blown!! But this response changes as soon as any Keralite leaves their homeland and then instead of that long face, the face glows up with inexplicable happiness at the sight of Puttu and it ‘s like, "WOW….Puttu!!".

Puttu is a staple in Kerala households, something that can be made in a jiffy, something that can be made with readily available ingredients in any Kerala household, something that can be accompanied with any variety of side dish and probably that is the reason why it is repeated so frequently in a week. I remember our childhood days and that mad rush hours in the early mornings, before going to school……my mother, like many others, was so skilled at multi-tasking, used to finish cooking breakfast and a full lunch, from the scratch and pack our lunch and snack boxes before 7.45am, for three of us….and it was also common that she would be holding one of our textbooks, preparing us with our lessons and also helping us complete our homework and my father would be pressing our uniforms and helping my mother in all the non-cooking activities, like breaking a coconut by striking on the shell with a machete like knife and very tactfully collecting the coconut water onto a glass……there was acute competition for grabbing that glass of coconut water as it used to be utterly sweet……and then Mummy used to sit on that Chirava, a wooden seat attached with a serrated blade, for scrapping the coconut and then mixing the rice flour and grated coconut mixture in a haste and then steaming the dish in a bamboo cylinder…..and after going through the entire process, as though she was on a time bomb, when she brought that plate of Puttu to her two lovely kids, who would be waiting to say ,” Ohh…again…??? “So naïve and irresponsible!!! I feel so embarrassed when I unpack my memory sack to those days, considering the fact that whipping up two meals from a scratch consecutively for four days, is enough for me to take a day off on the fifth day!!!! How the hell did she manage cooking up three full meals from the scratch and a home made evening snack on all 7 days a week, at a period when dishwasher and microwaves and frozen vegetables and fruits were not a familiar sight in the markets!!.

Well, the story does not end here…..After forcefully having that breakfast, I used to run to catch my school bus and while waiting for the bus, my attention would be probably at the Chaaya-kada (tea-shop) , across the street……various breakfast items shelved in the glass racks….and the man over there crushing Pappadam (Indian wafers) to the white cylindrical Puttu and squishing ‘em with kadala Curry (Black Chickpeas) and popping it in his mouth and sipping piping hot tea along with it ….Slurrrrrppppppp!!!! Having said NO to homemade, hygienic, love coated Puttu, this sight was something irresistible for me!! May be this is something like ‘neighbors plate envy’ syndrome…I don’t know….but if given a plate of Puttu and Kadala curry at that moment, I would have gobbled them up instantaneously :)

And it was during my hostel days in Chennai, I literally realized the value of Mummy’s food and Puttu in particular, as what we were served occasionally in that name was something like steamed rice flour with no signs of grated coconut. And when I started my married life, I tried making Puttu but failed miserably as my Puttu never used to cook well, until my dear friend AL pointed out that the mixture should not be stacked in the mould, instead loosely fill them and from then onwards, I never grumbled or got to hear any complaints as well.

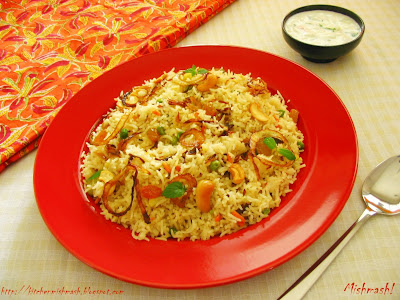
Puttu can be made with rice, wheat, ragi flour etc. The accompaniments to Puttu vary from Kadala curry (black Chickpeas) to steamed ripe plantains or spicy meat curry or ghee and a dash of sugar, or cherupayar curry (Green Grams) to my all-time favourite combo, Puttu and Fish curry. There are some who would like to have with fresh ripe bananas or ripe mangoes and there are some who like to have with black tea or a milk-tea! Erachi Puttu (Steamed rice flour cakes with spicy meat layers) is another variety. Last month a friend of mine mentioned about this variety, after she had it from a Mappila/Muslim food festival at our hometown in Kerala and she tried to give me a rough idea about the meat mix and then I remembered having seen a recipe HERE. Finally I decided to try this and tweaked my cutlet mix recipe a bit and there was a winner! :)

Ingredients for Meat Mixture:
  • 1 ½ cups cooked or uncooked minced meat
  • ¾ cup minced big onion (1 medium size)
  • ¾ tbsp minced ginger
  • ¾ tbsp minced garlic
  • 4-5 green chilies minced
  • 1 spring curry leaves coarsely chopped
  • ¼ tsp turmeric powder
  • ½ tbsp coriander powder
  • ½ tbsp pepper powder
  • ½ tbsp garam masala + ¼ tsp
  • ¼ tsp finely crushed fennel seeds/Perinjeerakam
  • 1 tbsp ketchup OR ¼ to ½ cup finely chopped tomato *
  • A handful of green peas (around 1/8 cup)
  • 1tbsp oil
  • Salt to taste.
Directions:
  • Heat oil in a pan and throw in minced onions and cook until they begin to look golden brown. Add minced ginger, garlic, green chilies and curry leaves and cook until they are soft. To this add turmeric powder, coriander powder, pepper powder, crushed fennel seeds and garam masala and stir well until the raw smell goes and the spices are well coated with the fresh ingredients. Now add tomato and mix well and cook till it is soft and at this stage add the uncooked minced meat and salt and let it cook thoroughly; this might take 10-12 minutes. If the cooked minced meat is used, then stir-fry only for 2-3 minutes until all the ingredients are well combined. When it is almost done, add green peace and cook for 3-4 minutes and also sprinkle ¼ tsp garam masala to retain the aroma of the spices. Once it is done (should be moist), let it cool down a bit in room temperature.
Ingredients for Puttu:-
  • 2 cups Rice Flour
  • 1 ½ cups grated coconut + ¾ cup for layering
  • ½ to ¾ cup water OR Coconut water (depending on the quality of rice flour)
  • ½ tsp salt
Directions to make Puttu Mixture:-
  • Dry-Roast the rice flour in low heat for 1-2 minutes, stirring continuously and when it is just warm enough, when you touch with fingers, remove the flour to a large bowl and let it cool. Do not engage yourself in any other activities during this process, so as not to burn your rice flour.
  • In a large bowl, mix roasted rice flour with salt and grated coconut and sprinkle water intermittently while mixing with hands and break the lumps formed as you mix. Mixing should be gentle enough and mix well until the mixture is damp enough or slightly wet. The right consistency is when the rice flour-grated coconut mixture is a damp-powdered form and not sticky dough; As my S aunt taught me, “when you grab a handful of the mixture and make a fist with it and if it holds together and then breaks when you loosen the fingers, then you have reached the right consistency!!”
Directions for final assembling of Puttu Mixture and Meat Mixture:-
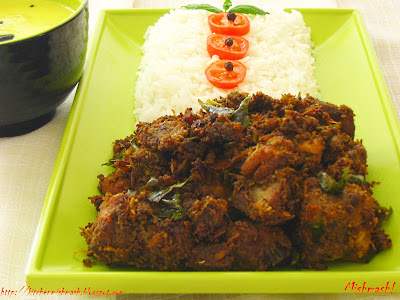
  • To make the Chirattaputtu (Meat Puttu in Coconut shell): Drill a small hall in the halved and emptied coconut shell/chiratta and make a first layer with a tablespoon of grated coconut, another layer with ¼ cup of Puttu mixture, third layer with meat mixture, one more layer with Puttu mixture and sprinkle some grated coconut on top. You should not stack the mixture, just fill in loosely. Heat water in a pressure cooker and when the steam starts coming out, place the Chiratta/shell on the nozzle of the pressure cooker and keep a kitchen napkin as a lid for the chiratta/shell. Let it steam for 6-8 minutes in medium heat and then remove and invert the chiratta/shell on to a plate and slowly lift the shell. If it is cooked well, then the Puttu will come off of the chiratta/shell very easily, in the shape of the shell itself. Serve hot.
  • To make Kutti puttu/ Cylindrical Puttu, use a Puttu Kutti/Puttu Maker and layer the mixture the same way as mentioned earlier and place it on the pressure cooker and let it steam-cook for 8-10 minutes. Once it is done, place the cylinder on to a place and using a skewer, slowly push from the bottom of the cylinder and Voila! If it is perfectly cooked, you will get a cylindrical shaped Puttu without breaking or crumbling :)
* Note: If you want your meat mixture to be moist, then use the tomato; if you are looking for a spicy-meaty mixture, use 1 tbsp ketchup instead of tomatoes. Though my personal preference is for spicy-meaty one, I want my Erachi Puttu to be moist and hence I prefer using tomatoes.

Phew!!!!! I have never experienced so much of confusion and difficulty in explaining a recipe. If "A picture is worth a thousand words", then there is no equivalent to this pictorial which gives a thorough understanding of the entire Puttu Making Process. For more , click here.

This goes to WBB#12, hosted at Trupti’s.

Wonder why Puttu is not served here in Indian Restaurants in US, along with Naan, Roti, Idli, Dosa and Pongal ! Aren't we/they missing something ??

Luv
Shn

No part of the content ( articles, photographs, recipes) of this blog may be reproduced without my written permission.Copyright © 2007-2010 Kitchenmishmash.blogspot.com. All rights reserved.

Sunday, June 17, 2007

Vegetable Ghee Rice - Indian Rice flavored with whole spices and vegetables in Ghee.


During my teens, attending marriage receptions and related functions were not all that exhilarating to me, unless I had some of my cousins or friends to give company…. But every rule has some exceptions….so this particular dislike was not there when it came to attending Mappila/Muslim marriage ceremonies……..I still have a very vague memory of the rich and festive ceremonies at one of our family friends’ daughter’s Mailanji Kalyanam, a Mehendi ceremony which is a pre-wedding ritual among the Muslims of Kerala.…….I think I was a very small kid at that time, may be in my 1st or 2nd grade but that evening is still crystal clear in my mind…..a group of girls, dressed up in bright and vibrant Muslim attires , decked up with ornaments, singing Mappilappatu and performing Oppana…..those girls moving in circles, clapping their hands with a rhythm…….the illuminations in the hall….I regret to say I cannot recollect the bride’s face but that festive mood prevalent in that hall is still fresh in my mind!! And when I grew up, Muslim marriage ceremonies attracted me not just because of the Oppana and Mehendi ceremony but there was something else too…what lured me was the tantalizing aroma and richness and taste of their feast, especially Biriyani, Neichoru & Kozhi curry (Ghee Rice & Chicken Curry) etc…..It might sound funny to you, but after enjoying all that rich food, coming home and smelling our own hand, reliving the aroma and taste of that food again, used to be a pleasant routine for me :)

Ghee rice, a Muslim specialty, popular for its simplicity, is basically basmati or any long grain rice flavored with whole spices and ghee, garnished with some fried nuts and raisins and fried onions…..Vegetable Ghee Rice is a cousin of this original recipe or to put it lightly, it’s a ghee rice with more family members!! I tasted a similar dish for the first time at one of our friends, R & B’s house. I tweaked the recipe a bit and now it is one of our favourite dishes, something which I cook with confidence, when we have friends coming over for dinner or lunch.

Ingredients for Vegetable Ghee Rice:- (Serves 2-3)
  • 1 small size, big onion thinly sliced
  • ¼ cup golden raisins/kismis
  • ¼ cup halved cashew nuts
  • 2 ½ cups Basmati Rice
  • 5 cups Water
  • 2 cardamom pods
  • 4 cloves
  • 5-7 small ½ inch long cinnamon sticks
  • 1 bay leaf
  • ¼ cup green peas
  • ¼ cup green beans chopped
  • ¼ cup cauliflower florets chopped (as small as pearls)
  • 3 tbsp carrot coarsely chopped
  • Ghee - 3tbsp + 2tbsp + more for frying the onions
  • Salt to taste
  • A pinch of sugar
Directions:
  1. Wash and drain the rice on a paper towel. When it is medium dry, heat 2 tbsp ghee in a large pan and splutter cardamom, cinnamon, cloves and bay leaf; add rice to this and stir continuously for 2-3 minutes in low heat and keep them aside.
  2. Heat 3 tbsp ghee in the same pan and fry the raisins, stirring continuously until they turn plump or look like golden grapes and keep them aside; fry the cashew nuts in the same oil, till they turn golden in colour and let both the nuts and raisins drain on a paper towel. In the remaining oil, sauté all the veggies for 2-3 minutes in low heat, with some salt, until they are well coated with the oil and cooked slightly. No need to cook them fully, as veggies will be cooked along with the rice again. Remove all the veggies and add more ghee to the pan to fry the thinly sliced onions till they become golden brown; at this stage sprinkling a pinch of sugar to the onion, while frying, to get a taste of nice caramelized onions is a good idea; remove the fried onions from the oil with a slotted spoon and let them drain on paper towels.
  3. Before cooking the rice, keep a spoonful of fried nuts and raisins and half of the fried onions, separately for garnishing. Microwave Method: Mix everything together- fried rice with spices, onion, nuts, raisins & veggies- with 5 cups of water (2 cups of water for 1 cup basmati rice) and adjust the salt and pop it in the microwave and cook for 23-25 minutes or until rice is done. Stove-top Method: Boil water in a heavy bottom cooking vessel, and when it comes to boil, add all the ingredients and bring it to a boil again and then reduce the flame and cook covered in low-medium heat, until rice is fully done and water is absorbed. Using a fork, gently separate the rice, so as not to get sticky, and leave it covered for another 10-20 minutes, for all the flavours to set in. Garnish with the rest of the nuts, raisins & onions and serve with Raitha (Coarsely chopped onions, tomatoes and cucumber mixed in yogurt with a dash of salt and pepper), Pickles and some spicy Chicken/Mutton curry, which is a real bonus to this dish.
Note: For a healthier version, onion can be fried in vegetable oil, instead of ghee. Make sure that onions are not burnt or browned too dark, as this leads to changing the colour of the rice when cooked. Here is recipe for a regular Ghee Rice.

Luv
Shn

No part of the content ( articles, photographs, recipes) of this blog may be reproduced without my written permission.Copyright © 2007-2010 Kitchenmishmash.blogspot.com. All rights reserved.

Sunday, June 10, 2007

Orange Delight in Orange Cups, Orange Ice Bowl as Centerpiece and a Meme!


I have been carrying my emotional virtual-knapsack for quite some time, forcing you to read and making you traverse down my memory lane.….thought today I will leave the knapsack behind for sometime…..or is it a better way of saying, I am going through some sort of ‘blogger’s block’ and really don’t know what to write?? !! :)

Well, Susan of The Well-Seasoned cook and Cynthia of Tastes Like Home have tagged me to write my first Meme, The “IT” girl- 7 Random Facts About Me. It sounds easy but not for me!! Anyway, I will write some ME facts paired with some foodie facts as well:
  1. Gluttony.com – Yes, probably it’s the best name that suits me and I have been blessed with this name by one of our professors! In college, we used to have seminar and assignment discussions with our guide in the evening, after the college hours which used to extent till late evening; one day he offered us some cakes and there was one last piece left….everyone was reluctant to grab that piece except me and that moment he blessed me with the name “Aakrantham.com” aka gluttony.com :) In my defense, I was damn hungry that evening!
  2. Phobia.com – Maths phobia!!!! I still don’t know how I passed my Mathematics and Statistics exams. I was sitting in the first class of entrance coaching for the Masters program and unfortunately it was a mathematics class…..towards the end of the class, the coach came and asked softly, "do you have some maths phobia?" !!! Wonder how he figured out that in less than an hour……must be because of the strange look on my face!!! :P
  3. Best friend of chocolate lovers – because I don’t like chocolates : D
  4. An average cook and I do not own a single cookbook - the recipes I have blogged so far are collected from my family and friends….I am not very innovative when it comes to cooking….an average cook……if given a chance I will take a deviation en route to kitchen ….if Mummy is at home, one can never spot me anywhere near the cooking area…..I started taking cooking with some genuine interest only because of CJJ who loves to eat :)
  5. Cannot resist pizza ads –…for that matter, I cannot resist any food temptation…..!
  6. Scared of snakes - close my eyes even when I see a picture of ‘em….it’s almost a reflex action for me :(
  7. Do not like those red signals when behind the wheels :)
Let me tag Kitchenfairy, Pravs, Sandeepa, Sia, Susan and Trupti. Friends, take it up if you have time :)

Well, let’s come to our business….I mean, let’s talk about food. Every month when I get my monthly subscription of Martha Stewart Living, I smell the book first….then gently flip those glossy pages……enjoying the brilliant photos and admiring the work of food stylists…….and then slowly settle at my favourite section on the magazine, Good Things, where they give some simple but cool, fabulous ideas and it was on one of those pages I came across this refreshing idea of serving desserts in halved and hollowed-out citric/fruit cups. Another one that caught my attention was decorative ice bowls made with herbs, citric slices and edible flowers. And I always wanted to try this at home and hence I was quite excited when I found out that Orange was the chosen fruit for this month’s A Fruit A Month blog event and exactly around the same time, my friend SM who always shares crowd-pleasing recipes like, Mango Sorbet with Mango Sauce and Deviled Eggs-Indian style, recommended this particular recipe for Orange Delight. So that was one more reason to try out the citric/fruit cups idea :)


Orange Delight is a creamy dessert with a light tangy taste which may not make a very good ‘first impression’ at the first spoonful but from the second one, you will get hooked on to it. We couldn’t stop with just one cup :) Recipe follows:

Ingredients for Orange Delight: (Serves 6-8)
  • 1 1/2 cups of orange juice (I used Tropicana-no pulp)
  • 1 1/2 tbsp unflavored gelatin
  • 1 can (14oz) sweetened condensed milk
  • 1 cup of whipped cream
  • ¼ tsp orange rinds
  • Orange cups for serving (Optional)
Directions:
Soak the gelatin in orange juice and then stir continuously until it dissolves thoroughly. Whip the cream until it doubles in quantity and reaches a creamy consistency. Add sweetened condensed milk to the cream, and then pour the orange juice and orange rinds and mix well very gently. Chill for 8-10 hours and serve in orange cups or small dessert bowls.

Preparing the Orange cups:
After squeezing out the juice from halved oranges, instead of throwing it in the trash, collect and keep them. Remove all the pulp left and clean the inside neatly and sprinkle some sugar on the insides and refrigerate them and fill these cups with Orange Delight and chill before serving to your guests.

Note: One of our friends has tried replacing the canned/bottled orange juice with fresh orange juice and the taste was not very impressive and hence bottled orange juice is recommended for better results.

Orange Ice Bowls

You need:
2 stainless steel bowls (One should fit inside the other with ½ inch to 1 inch between them)
Orange slices
Some green herbs (optional)
Ice cubes and water
Tape

How to: Put some ice cubes on the bottom of the bigger bowl and place the smaller bowl on top of that. Slide in some orange slices on the sides and green herbs, if any. You may use a skewer to arrange the citric slices and herbs, if it is difficult to manage with hands. Fill in water between bowls to ½ inch from top. Tape the rims, so the bowls stay together and the ice bowl, when frozen, has a smooth surface. Freeze overnight and then let it stand in the room temperature, on a dish towel, for around 15-20 minutes or until the bowls separate easily. Take the top bowl and then invert the bottom bowl to remove the ice bowl. Freeze until the guests arrive and then place it on your table, with a dish towel underneath to catch drips.

This decorative bowls can be used to serve your must–be-chilled foods like Champagne, salads, cocktail shrimps etc. If you are serving any other condiments that should stay dry, place a glass bowl inside the ice bowl and serve the condiments. A simple but great idea to delights your friends and guests :)

These are my entries for this month’s AFAM, hosted by a passionate cook and a fellow blogger, Sharmi of Neivedyam

There is another very interesting blog event, Centerpiece of the Month, hosted by Janelle of Talk of Tomatoes. Orange Ice Bowl is my contribution to this excellent idea of hers, encouraging the fellow bloggers to come up with novel and unique centerpieces every month.

* The idea of using Citric/fruit cups and Ice bowl is adapted from Martha Stewart Living

Luv
Shn

No part of the content ( articles, photographs, recipes) of this blog may be reproduced without my written permission.Copyright © 2007-2010 Kitchenmishmash.blogspot.com. All rights reserved.

Sunday, June 3, 2007

Chicken Roast With A Kuttanadan Touch !


I still remember how those fragile, wrinkled and shriveled hands reached out to me from the crowd, on the day of our wedding and how her eyes welled up with tears of joy, looking at me and CJJ as a couple and how she kept telling that she would include us in her daily prayers………the warmth and comfort I felt when she held my hands in hers, was quite re-assuring for some reason…….I don’t know why………but after that day, it took us 2 years before I could really spend some quality time with her…..all those days, whenever CJJ used to wax nostalgically about the days he spent with her…how she used to feed him…..how scrumptious her food was, somewhere I was missing my grandma……and the fact that both of them shared the same name and hailed from neighboring towns, somehow made me more close to her …….

On our vacation in Kerala last year, we were lucky to have CJJ’s grandma at his place…….and whenever we were there at his place, we kick-started our day, saying good morning to her, with a cup glass of tea and then listening to the myriad of stories she had to share …..her school days…..the books she read……what amazed me was her memory power even at the age of 80’s………and the clarity and diction with which she used the English words……..and it did crack me up when she proudly said, she was using a blender from ‘Braun’!! She used to blush with embarrassment when CJJ used to tease her for some silly reasons…… Her face used to beam up when she found me talking about cooking ……and the relief on her face when I came wearing a Salwar Kurta, to go to church.....I am sure she was anxious that I would wear some modern outfit to their very orthodox church.
When our mothers were glued to television watching those soap serials, she was more interested in watching the news and getting updated on the local political scenario! Though a very fragile woman, she does not like to stay with her children…she likes staying on her own, sitting by her window, enjoying a glass of tea in early mornings, listening to the radio and then slowly starting the day with her prayers …….. she has a routine of her own…..and the only thing she demands from us is 2 days from our next vacation, to stay with her at her place, so she can cook and feed us and then show around the neighborhood in Kuttanadu!

Yes, I do want to stay with her…..listen to her stories…..taste her food and ofcourse enjoy the natural beauty of Kuttandau, "the rice bowl of Kerala", a place near Alappuzha and as I have already mentioned in one of my posts, I have never been to Kuttanadu, and from what I have gathered from CJJ’s vivid descriptions, this place is laced with palm fringed canals and small rivers… lush green paddy fields……locals traversing in small country boats……. men herding a flock of ducks and the tail wagging and quacking of ducks !! It’s not just my husband who makes me go crazy with all these details… it is as though, my brothers-in law have also taken their vows to tickle my imagination….when one claims that it is heaven, then the other goes one step ahead and sends me the picture of mouth-watering duck roast their grandma makes!! I had no other option but to call her up and learn to make the chicken roast…..and I was quite surprised to learn that her famous chicken and duck roast is made with very few ingredients. I had to double check with her if there was no need to add coriander powder, chili powder and tomatoes which is generally used in chicken roast preparations, which are either curried and then pan seared or deep fried and then roasted but this preparation is based on grandma’s recipe! I have already blogged her Pepper Fish Fry, here’s another one!

Step 1: Ingredients to marinate chicken:-
  • 1 ½ lb chicken cut into small pieces (Around ½ to ¾ kg)
  • 3 ½ tbsp Masala Powder* (Recipe follows)
  • 1 ¼ tsp freshly ground pepper powder
  • ¼ tsp turmeric powder
  • 1tsp vinegar
  • 3 finely chopped green chilies
  • 2tbsp Oil, preferably coconut oil
  • Salt to taste
  • 1-2 tsp water
Step 2: Ingredients to roast the chicken:-
  • 2 cups thinly sliced small red pearl onions/shallots
  • ¼ cup finely chopped ginger
  • ¼ cup finely chopped garlic
  • 3 green chilies
  • 1 sprig coarsely chopped curry leaves + 2 sprigs
  • ¼ tsp Masala Powder* (Recipe Follows)
  • Salt to taste
  • 1-2 tbsp water
Directions:
  • Wash and cut the chicken into small bite size pieces with slits on the flesh. Make a paste with masala powder, pepper powder, turmeric, vinegar, green chilies and salt with 1-2 tsp water and marinate the chicken well and leave for 30 minutes in the room temperature. This helps the marinade to penetrate into the meat.
  • Heat oil in a large pan and sauté small onions until they turn transparent and then add green chilies, ginger, garlic and curry leaves and cook until they are soft. At this stage add the chicken and sprinkle 1-2 tbsp water and cook for around 20 minutes in low heat or until the raw smell goes. Transfer this chicken masala to a pressure cooker and I generally wait for 3-4 whistles.
  • When steam goes and cooker cools down, transfer the pressure cooked chicken with the gravy, back to the large pan and in medium heat, bring it to a boil. There is no need to add more oil at this stage. Sprinkle ¼ tsp masala powder ( to get the aroma of the spices) and adjust the salt and generously use 2 long sprigs of curry leaves and then reduce the heat to low and let the slow cooking begin. Keep stirring, until the gravy is well coated with the chicken and completely dry, making sure that the gravy does not stick to the bottom. This slow-cook-dry-process will take 15-30 minutes depending on the amount of the gravy. Serve hot with rice/Chappathi/Appam.

*To Make the Masala Powder: - (Approx. measurement shown in the picture)
  • ¼ cup fennel seeds/perinjeerakam
  • 12-15 cinnamon/karugapatta
  • 8-10 cloves/grambu
  • 2 cardamom/Elakkaya
How to: Grind all the ingredients together until it becomes a fine powder. Use sparingly as per the measurement listed in the recipe. There is no need to roast the the masala powder before marinating the chicken.

Note: The taste of this dish mainly depends on the masala powder used and also on the fresh ingredients. Hence, to get the authentic taste, it is better to stick on to the masala powder recipe given above and also stay away from using big onion instead of small onions and store bought ginger-garlic paste instead of finely chopped fresh ginger and garlic. Also there is no need to add tomato. I have personally tried out all these variations and alternatives, but it does not come anywhere near the original recipe. So trust me!


Verdict: Husband does the ‘taste-test’ and comments (or recommends?),” hmmm…..mm….it has the authentic taste……A ‘naadan’ taste……” He takes one more bite and tells the wife, “…mm…really good…..hey, why don’t you blog this?”!!!! Should I add anything more than this?:)

For more of grandma's Kuttanadan recipes, CLICK HERE.

Luv
Shn


No part of the content ( articles, photographs, recipes) of this blog may be reproduced without my written permission.Copyright © 2007-2010 Kitchenmishmash.blogspot.com. All rights reserved.