|
|
  Shall I give you a break from my lengthy prefaces and go straight to the recipe? :) Shall I give you a break from my lengthy prefaces and go straight to the recipe? :)
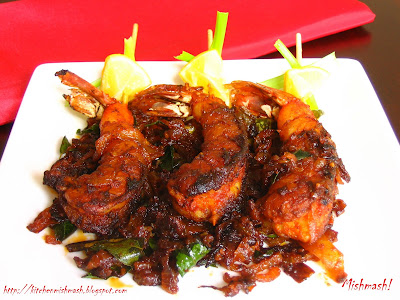
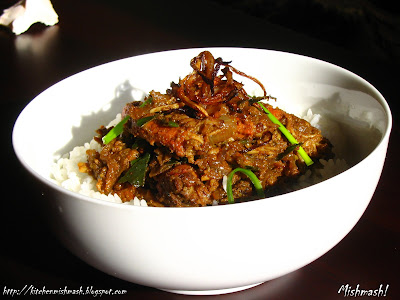
Staying in a place blessed with abundance of fresh seafood, my mother always knew how to preserve the essence of seafood, especially prawns, with her careful use of spices. Also, she always made sure that such preparations were served with light and simple curd based curries and vegetable stir-fries for our everyday meals, so that our taste buds really appreciated the flavours of sea. The ingredient list and cooking process may seem somewhat similar to my Chemmeen Varattiyathu/Spicy Prawn Roast which I had posted sometime back, but this is not heavily spiced up with pungent fennel and peppercorns and still the simplicity shines in all its vigour !
Ingredients: - ½ kg (approx. 1.14lb) prawns or shrimp peeled, deveined and washed thoroughly
- 1 ½ cup red small onions thinly sliced
- 1 tbsp garlic minced
- 1 tbsp ginger minced
- 4 green chillies split lengthwise
- 2 sprigs of fresh curry leaves
- 1/3 cup small coconut slices/’Thengakothu’
- 1 piece ‘kudam-puli’/Gamboge
- ½ tsp + ½ tsp homemade garam masala
- ½ tsp + 1 tsp red chilly powder
- ¼ tsp + ¼ tsp turmeric powder
- ½ tsp pepper powder
- Salt to taste
- 2 tbsp coconut oil
Directions: - Make a marinade with ½ tsp garam masala, ½ tsp chilly powder, turmeric, salt and few drops of water and apply it thoroughly on the cleaned prawns, using your hands and leave it in room temperature for around 20 minutes. Soak the kudam-puli in some water to make it soft.
- In the meantime, chop the red small onions, ginger and garlic.
- Heat oil in a big shallow pan, sauté the small onions until they turn pale in low flame; add minced garlic and ginger cook until everything turns transparent, At this stage, add turmeric powder, 1 tsp red chilly powder, pepper powder and garam masala and stir continuously until the raw smell goes and spices are sautéed well and combined thoroughly with the base mixture; make sure that you don’t burn your onions or spice powders. Now add the coconut slices (coconut slices should be smaller than the prawns) and a sprig of curry leaves and combine well with the base mixture and then add the marinated prawns to this; take out the leftover masala from the bowl by adding a couple of tablespoons of water and pour it to the pan and also the softened kudam-puli (without water) and cook covered, in medium heat, until the prawns changes its colour and is almost cooked. Do not add water to cook the prawns. Once the prawns are almost cooked, remove the lid and sauté them, in low flame for 5-10 minutes, until prawns are coated well with the spices, as in the picture. Whether to make it dry or keep it with some gravy-like masala, is purely one’s choice. Do a taste –test in between and adjust the salt, if needed. Just before turning off the stove, tear a sprig of curry leaves and coat the entire dish well with this herb.
- Serve warm with rice or chappathi (Indian bread).
You may be also interested in :
Other Kerala Seafood specials from this blog:
LuvShn
|
No part of the content ( articles, photographs, recipes) of this blog may be reproduced without my written permission.Copyright © 2007-2010 Kitchenmishmash.blogspot.com. All rights reserved.
|
  In the company of ruby red apples and sapphire green pears, amber gold apricots adorned the fruit stand with a jewel studded look……With a light blush and a velvety skin, they reminded me of my soft flannel blanket……I caressed 'em....they sat there like a bunch of naughty adorable cuties……Dancing on my head were the delightful taste of the apricot jam I bought from the Amish country store a couple years back……..I caressed ‘em again and this time they gave me a bewitching smile …Off they jumped into my shopping cart……Sitting there in a cluster, doing a shake dance , their crimson cheeks blushed more…. I proceeded to the check –out……we came home …they were still happy enjoying each others company…….but soon they were crying out loud for help……….Without a prick of conscience I ripped their chests apart.....crushed their heart kernels…..and off they went into a hot pan……..20 minutes down ……I got a pretty golden sweet delight sitting on my counter top……that pretty jar smiled at me with its new found joy, holding the new beauty queen……..….but deep down in my heart, I missed those golden cuties with their plump crimson cheeks, their velvety skin and the bewitching smile that captivated me !!! ***
As a guide, I followed this well written article on Apricot preserves, capturing summer in a jar, and followed Martha Stewart’s recipe with some subtle changes in the measurement. I had only about 2 lb apricots for which I added 2 cups of granulated sugar, ¼ cup water and 2tbsp lemon juice and 4-5 apricot-almonds. Since I didn’t want a chunky preserve, I crushed the chopped fruit chunks, with the back of the wooden spatula, while stirring. Also I stirred for another 5 minutes after adding lemon juice, apart from the first 15 minutes. Before ladling in to the jar, apricot-almonds were picked out using a fork. I was lucky to get the right consistency of jam as well as the right sweetness for my personal taste. Those who prefer sugar loaded jams, do add more but those who like to enjoy the mild tartness of apricots, it is advisable to reduce the sugar amount mentioned in Martha’s recipe. ***
It is amazing how sometimes we pray for people whom we have never known till date …..it happens to me very often and it happened very recently too. Her picture moved me……calmness on her face and hopes in her eyes…….after reading that post, I hoped she continue to smile and stay in good health for many more years……My prayers are with you, Bri! ***
Well, I have always felt that there are many bloggers out there who create absolutely brilliant literary stuff and click awesome pictures, out of passion and interest. Some of them are really better than those who are paid to do such works and material is worth publishing too. But some people with or without knowing the blog etiquettes, lift these works and publish on their sites and make money out of it too. This could be individuals or biggies in the business who are well aware of the copyright issues. Some in the former category is courteous enough to take off the plagiarized content when they are approached but some are not!!! They start with stealing and go to the extent of threatening, e-harassing using filthy language, cyber stalking and even creating a profile for the blogger in their adult site!!!! Sounds strange? Sounds all filmy? But this is what one of us went through for raising her voice and requesting to remove a plagiarized content. You can read all about it HERE. Hope she wins the battle! You all have a great week ahead. Btw, do try making jam at home once because it is simple and tasty…..and remember, there is no preservatives…it is all natural :) Luv Shn
|
No part of the content ( articles, photographs, recipes) of this blog may be reproduced without my written permission.Copyright © 2007-2010 Kitchenmishmash.blogspot.com. All rights reserved.
|
 An excerpt from the speech made by Egg Biryani at the National Biryani Fest 08….“My dearest gastronomists…….till yesterday, I was this undiscovered jewel, in the deep sea leading a dreary life ………when all my peers made it to the glitz and glam of the dining table receiving great raves from the guests, I was sitting there, with a heavy heart, waiting for the day I will be finally asked to come to the spotlight……but I was always that neglected cousin……many thought of me only when meat loaded freezers and vegetable studded crispers got empty and they had no other option but to dress me up with some curried masala and herbs and then layer and mix with some ghee rice. Yet, I could not impress anyone until the day an artist gave me a much needed makeover……I was given layers of flavour and an identity of my own…..the artist moulded me into a scrumptious delicacy people would crave for, even in their dreams!! ………………”***
This dish is our recent discovery, a new favourite and addition to our repertoire. On one of my aimless leapfrogging on the World Wide Web, I happened to get a glimpse of handful of recipes from ‘The Epicure Cookbook’ by Ms.Ummi Abdulla who captured the essence of Malabar cooking in her cookbooks and introduced this piquant cuisine to the world. The moment I glanced through the recipe, I knew there was something different about it as egg omelette constituted egg masala instead of hardboiled eggs, which in this case was only used as a topping and more than a garnish. Secondly, one more layer of flavour was added to the ghee rice by spicing it up with a green chilly-ginger-garlic paste which gave a real kick to the entire dish. The egg masala was again a surprise as it missed the regular spice parade of coriander powder, chilly powder etc.As much as I was bowled over by the recipe, there were some areas I wanted to add my personal touch. The original recipe does not call for mint leaves and personally I cant imagine a Biryani without the refreshing fragrance and taste of mint leaves and hence I added some; again while layering the dish, I sprinkled some ghee and Biryani masala for an added layer of aroma and flavour; also fried the hardboiled egg with a dry spice rub to jazz up the topping; you may skip it and use plain hardboiled eggs. All these additions gelled well with the original recipe, giving us a real masterpiece.Mutta/Egg Biryani - Malabar Style ( Serves 4 adults )(Recipe Source: Adapted from 'The Epicure Cookbook' by Ms. Ummi Abdulla)
Step 1: Make Biryani Masala/Dry Spice Mix- ½ tsp fennel seeds/Perinjeerakam
- ½ tsp cumin seeds / Jeera
- ½ tsp Shahjeera/Caraway seeds/Sahjeerakam
- 4 cloves (Gramboo)
- 1 cardamom/Elakkaya
- 1 flat cinnamon ( 1” inch length)/ Karukapatta
- ¼ tsp grated nutmeg (Jaathikka)
- 1 whole mace (Jaathipathri)
Grind everything to a fine powder. This yields around 2 tsp masala but you will require only 1 ½ tsp for making this dish.Step 2: Cook Flavored and spiced up Rice- 4 green chillies
- 4 medium garlic cloves
- 1” inch piece ginger, thinly sliced
- 1 medium size big onion, thinly sliced
- 3tbsp ghee
- 4 pods of cardamom
- 4 cloves
- 1 ½ ” inch flat cinnamon stick, broken into 4 pieces
- 2 ½ cups Basmati rice (around 1/2 kg)
- 5 cups water
- Salt to taste
Grind green chillies, garlic and ginger into a paste and keep aside.Wash and drain the rice on a paper towel. When it is medium dry, heat ghee in a large skillet and throw in cardamom, cloves and cinnamon. Now add thinly sliced onions and sauté till it is transparent; then add the ground paste, stir well till it gives out an aroma. Add rice and stir continuously for 2-3 minutes in low heat. Microwave Method: Transfer everything to a microwave safe bowl with 5 cups of water (2 cups of water for 1 cup basmati rice) and adjust the salt and pop it in the microwave and cook for 23-25 minutes or until rice is done. Stove-top Method: Boil water in a heavy bottom cooking vessel, and when it comes to boil, add all the ingredients and bring it to a boil again and then reduce the flame and cook covered in low-medium heat, until rice is fully done and water is absorbed. Using a fork, gently fluff/separate the rice, so as not to get sticky.Step 3: Make Omelette and Egg Masala- 3 eggs
- 2tbsp grated coconut
- A pinch of turmeric powder
- 1 big onion, chopped
- ¼ tsp chilly powder
- 2 Indian green chillies, finely chopped
- Salt to taste
- 2-3 tsp Oil
Beat the eggs and add all the other ingredients and mix well. Heat half of he oil in a pan, pour half of the egg mixture and make a thin omelet. Repeat the process for the rest of egg mixture to make a thin Omelette. When done, remove it to a chopping board and cut them into small bite size pieces and keep aside.- 1 ½ cup big onions, chopped
- 4 green chillies
- 6 big garlic cloves (approx. one small pod)
- 3” inch piece of ginger, thinly sliced
- ½ cup tomatoes, chopped
- 1 ½ - 2tbsp freshly squeezed lemon juice
- 1 ¼ tsp Biryani Masala
- 1/3 cup fresh cilantro/coriander leaves, chopped
- ¼ cup fresh mint leaves, chopped
- Salt to taste
- 2-3 tbsp oil
Grind ginger, garlic and green chillies into a paste and keep aside.Heat oil in a pan and cook thinly sliced onion, till they turn transparent; now add the ground paste and sauté till it gives out a nice aroma. Add chopped tomatoes and fry for a few more minutes. Now add the Biryani masala, and combine well with the base. At this stage add bite size piece of omelette and blend well, followed by chopped cilantro/coriander and mint leaves. Sprinkle lemon juice, mix well. Do a taste test here and adjust the salt. Turn off the stove and remove from heat.Step 4: Layering and Final cooking- 4 tbsp ghee
- 2 pinches of Biryani Masala
The final part of the cooking can be done either in a conventional oven or on stove top. Decide on your preferred cooking method and based on that decision, choose your cooking vessel. Pour 2 tbsp ghee into your cooking vessel; spread half of the rice at the bottom, followed by the egg masala and sprinkle two pinches of biryani masala; spread rest of the rice as the top layer and drop 2 tbsp ghee. Conventional Oven Method: Preheat oven to 350 F. Close the oven –safe dish with aluminum foil and cook for 30 minutes. Stove top Method: As per the original recipe, remove half the rice ( from the vessel you cooked rice earlier) to a plate ; pour the egg masala, sprinkle biryani masala and then transfer the rice, set aside in the plate, back to the cooking vessel. Keep a tight fitting lid and cook over very low heat for 5 more minutes. Note: I haven’t tested this method and hence I am not sure of the outcome.Step 5: Fry Hardboiled Eggs- 4 hardboiled eggs, halved
- A pinch of Biryani Masala
- A pinch of pepper powder
- A pinch of salt
- 2tsp Oil
While rice is at the final phase of cooking, hard-boil 4 eggs and when done, halve them. Sprinkle biryani masala, pepper powder and salt on halved eggs and shallow fry them in oil for a minute. Remove from the pan.To Serve: After the final phase of cooking, let the dish rest undisturbed for minimum 30 minutes on your kitchen counter. Before serving, stir the entire dish gently, mixing rice with the egg masala and plate it. Place fried eggs on top and serve with Pickle, puli inji, Pappadam and Onion-yogurt salad (Thinly sliced red big onion, 1 small green chilli chopped and mixed with yogurt and a dash of salt) or any one of these condiments.Cooking schedule I followed:- Wash and drain the rice
- Hard boil 4 eggs
- Make Biryani Masala/Dry Spice mix
- Make the chilly-ginger-garlic paste for rice and get the onions ready for rice
- Roast and cook rice
- While rice is cooking, make omelette and egg masala
- Layering and final phase of cooking
- Fry hard-boiled eggs while rice is at the last phase of cooking
- Serve.
Verdict: Fantastic! That is the only word I can find for this recipe and dish. I made it on a Saturday, had it for lunch and dinner and again for lunch on Sunday; Monday and Tuesday, both of us silently fantasized its taste and aroma and on Wednesday, it came out, “That egg biryani was really tasty…….feel like having it again now” !!!!!!!!!!!!!!!!!!!! If you trust me, go ahead and make it….it is delicious :)Other Rice specials from this blog: 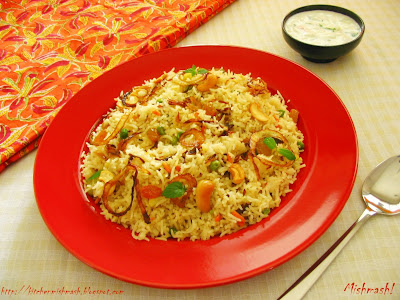    LuvShn LuvShn
|
No part of the content ( articles, photographs, recipes) of this blog may be reproduced without my written permission.Copyright © 2007-2010 Kitchenmishmash.blogspot.com. All rights reserved.
|
 Multi-colored candy rings of Poppins for a pack of Camel crayons…a stack of paper labels for a sheet of sticker labels… Archie & Jughead Double Digest for a packet of Luxor sketch pens… Bobanum Moliyum for a bar of 5 Star….colour chalks for those pretty white erasers wrapped with blue paper coming from Gulf…… SportsStar Magazine poster for a one day loan of ankle shoes to wear on the dress down day in school..glass bangles for ‘foreign’ hair band……..Don’t you think the elements of barter system was quite deep rooted in our lives even as kids? Did those elements fade away when we grew up?If you are beginning to say yes, wait….. How about that time, when you borrowed your friend’s branded jeans in exchange of your Physics record book? and the other time you exchanged a Nike cap for a Bryan Adams cassette ..and the other time you exchanged your jute handbag for an ikat dhupatta….and then other time you gave your history lecture notes for passing …… to …….you know it, don’t you? :P
Well, the practice of bartering was not just with stationery items or for a piece of cloth, it extended to food too, especially during the college days…….don’t you agree? We used to exchange our lunch and sometimes lunch boxes itself…..A’s appam and chilli chicken used to be with L whose chammanthi podi and kovakka mezhukkupuratti was for S, whose Idichakka thoran for my chappathi and beef fry! Butterfly days filled with rainbow colors!!! I was always excited about S’ Idichakka Thoran, which she used to bring over a layer of rice, mixed with Ulli Theeyal, in an oval shaped stainless steel lunch box, wrapped with a white and blue checkered cotton towel …….it was a simple preparation of tender green jackfruit with a touch of grated coconut, lightly spiced up with green chillies and a dash of pepper powder.
For my father, Idichakka Thoran is more than a side dish……during his childhood, it was an evening snack served with Kattan chaya/Black Tea! Surprising, isn’t it? But if you go back to 5 or 6 decades and look at a family with a dozen kids ( Oh yeah, my paternal house has enough members for an army battalion!) and a huge backyard with plentiful traditional veggies and fruits, enough to prepare a traditional feast and then sometimes, even the side dishes used to get its prime time show at the coffee table!
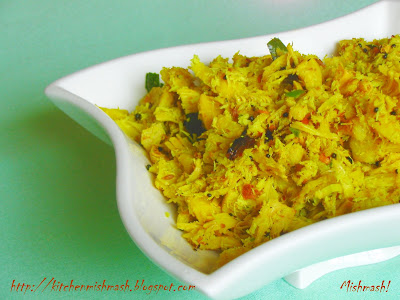
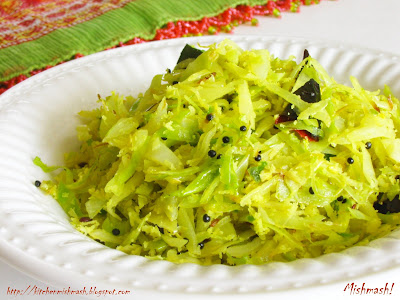
Side dish or snack, Idichakka Thoran is a traditional member of Kerala Cuisine that sometimes finds its place on ‘Thoosan ela’, depending on the season. Idichakka is tender green jackfruit, which weighs somewhere from ½ kg to 1 kg ; cleaned and diced, it goes into the ‘ural', and then pounded with a ‘ulakka’ (hence the name Idichakka) , the bigger version of today’s tabletop mortar and pestle set and then steam cooked and stir fried with a touch of grated coconut , mildly spiced up with green chillies, ginger, shallots and cumin and seasoned with our quintessential coconut oil, mustard seeds, dry red chillies and last but not the least, the fresh and fabulous, curry leaves.
 Ingredients: Ingredients:- 280gm cleaned and diced Idichakka/Tender & young green jackfruit ( I used canned, brined in water from a brand called, CHAOKOH)
- ½ tsp + ¼ tsp turmeric powder
- Salt to taste
- Around ½ cup water or just enough to cook Idichakka/Tender & young green jackfruit
- 1/3 cup tightly packed grated coconut
- 2small red pearl onions/shallots, finely chopped
- 4 green chillies, finely chopped
- ½ - ¾ tsp ginger, finely chopped
- ¼ tsp cumin seeds
- ¼ tsp freshly ground pepper powder
- 1 sprig of curry leaves
- 1 ½ tbsp coconut oil
- ½ tsp mustard seeds
- 2 whole dry red chillies
- ¼ tsp Uzhunnu parippu/Black grams/urad dal
Directions:
- Start by rinsing the drained Idichakka/Tender & young green jackfruit pieces in water, if you re using the canned product. Shred the pieces, using a fork or nature’s best tool, your fingers. In a skillet, throw in the shredded jackfruit flesh, salt, ½ tsp turmeric powder and around ½ cup of water or just enough to cook Idichakka/Tender & young green jackfruit and cook covered, till it is soft and almost done and then keep the lid open and let the water evaporate, in low heat; when it is done, transfer everything to a bowl. OR if you are using fresh Idichakka/Tender & young green jackfruit, cook and then shred the pieces by pounding them using a mortar and pestle set or pulse them in a processor, one or two times.
- Meanwhile, crush and blend grated coconut, chopped green chillies, ginger, small onions, cumin seeds and turmeric powder with a dash of salt, using your hands or pulse one or two times in a times.
- Using a kitchen napkin, dry the skillet, in which you cooked Idichakka/Tender & young green jackfruit. Heat oil in the same pan, and splutter mustard seeds, followed by Uzhunnu parippu/Black grams and dry whole red chillies. Sauté for 30-40 seconds; sprinkle freshly ground pepper powder and combine well with the coarse coconut mixture. To this add the cooked and shredded Idichakka/Tender & young green jackfruit and stir well and cook covered, in medium heat, for a minute or two. Do a taste test, adjust the salt and tear some fresh curry leaves and stir well; cook without the lid for a minute and turn off the stove.
- Serve with Kuthari choru or Kanji or as in the olden times, serve as an evening snack with a
cup glass of black tea!
You may check out other Thoran (Vegetable Stir fries with grated coconut) , recipes from this blog:
This post is part of SADYA VIBHAVANGAL – Learn to make the traditional Kerala Feast- An Artist’s Edible Palette!
Grandmoms used Ural and Ulakka, Moms use tabletop mortar and pestle sets, and we use food processors...where re we going next??
Have a beautiful week ahead! Update: You may also add a small garlic in the crushed coconut mixture as it is good for digestion.
Luv
Shn
|
No part of the content ( articles, photographs, recipes) of this blog may be reproduced without my written permission.Copyright © 2007-2010 Kitchenmishmash.blogspot.com. All rights reserved.
|
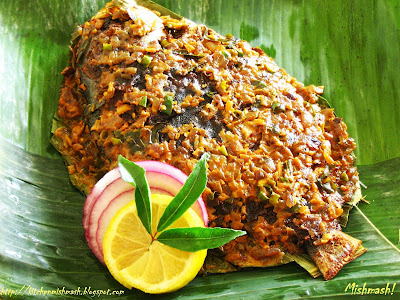
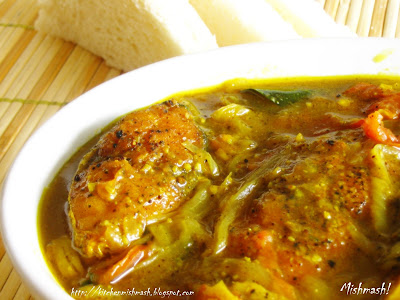
Fish Molee/Fish Molly! No, it is not fish cooked by aunt molly, though my aunt Molly also makes this dish every now and then! To my understanding, this stewed fish in rich silky coconut milk, flavored with fragrant fennel and pungent peppercorns, embellished with the tartness of tomato and vinegar, aroma of fresh curry leaves and coconut oil, has its culinary legacy woven intricately with Kerala’s rich socio-historic trail. Let me see if I can explain it in pure culinary terms. Start with Kerala’s long coastal belt, lined with coconut trees and abundance of fresh seafood…… stir in the seafarers like Portuguese, French, Romans, Dutch, Phoenicians, Jews, Chinese, Arabs & British who came in search for Kerala’s spice bank full of black peppercorns, ginger, cinnamon and turmeric…… blend in these traders’ culinary traditions ….. simmer their imported exotic spices and herbs like fennel, fenugreek, cashews, green chillies and coriander with the plentiful native spices , fresh produce, coconut and seafood….. season it with a very tolerant, warm-hearted group of people…..and when you plate it, you get this exotic, unique, piquant Kerala Cuisine! I am not sure of the etymology of the word, Molee/Moilee here, but from what I have read, it sure has a culinary trail, leading to these traders and the legacy they left behind.  Fish Molee/Fish Moilee/Fish Molly Fish Molee/Fish Moilee/Fish Molly is quite a refined dish in terms of its taste and texture that appeals equally to the local as well as western palate. I still remember the first time I cooked this dish …..I was a novice and as always, I collected my mother’s recipe and once I started cooking, I got perplexed seeing the simplicity of ingredients and wondered if my mother forgot to mention some spices. Heyyy!!! Moms get old and they forget things at times….dont they? :). So I brought in my culinary experience and added a couple teaspoons of coriander powder and finally it turned out something like a Fish Masala, with a totally different texture and consistency, which was exactly opposite to what I was used to, from my mother’s kitchen and I had my moment of truth, the next time I spoke to my mother, when she very sweetly told me.” You don’t have to use all the spices in your pantry whenever you make a dish…some dishes like Fish Molee tastes better when prepared with minimum spice mix” !!!!! Oh yeah….the day I realized, I need to really wait for decades to reach the level of culinary knowledge and experience my mother possesses!!!!! Ingredients:For Marinating:- 4 medium slices of cleaned fish ( King fish, Seer fish, Spanish Mackerel, Pomfret)
- Around ½ tsp turmeric powder
- ¼ - ½ tsp freshly ground black pepper powder
- Salt to taste
For Spice Mix:- ½ tbsp fennel seeds/Perinjeerakam
- ½ - ¾ tsp black peppercorns
- 1 flat cinnamon stick( 1” inch length)
- 1 cardamom
For Stewing:- 1 small size big onion, thinly sliced
- 1tbsp ginger, thinly sliced
- 4-6 Indian green chillies, slit opened lengthwise
- 1 small size tomato, cut into thin rounds; reserve 3-4 rounds for the last phase of cooking
- ½ tsp turmeric powder
- ¾ cup thin coconut milk
- ¼ cup thick coconut milk
- 1 small sprig of curry leaves
- ½ tsp plain vinegar
- Salt to taste
- 2 tbsp coconut oil plus more for shallow frying the fish in the beginning
Directions:- Grind the whole spices noted under spice mix to a fine powder and keep aside.
- Make a paste with turmeric powder, pepper powder and salt, adding a tsp of water and apply it on the fish thoroughly and let it sit for 15 minutes.
- Heat oil in a pan and lightly shallow fry the fish for a minute or two and keep aside; do not cook fully; this phase of the cooking is done mainly to make the fish pieces slightly firm and sometimes, to reduce the strong smell and also to enhance the taste of the fish.
- Heat coconut oil preferably in a ‘curry –chatti’, an earthenware or in a pan, and sauté thinly sliced big onion, until they begin to look pale; add thinly sliced ginger and green chillies and cook till everything turn transparent. Now add ½ tsp turmeric powder and powdered spice mix and fry for a minute or two in low heat. Later, add the thin rounds of tomato (do reserve 3-4 rounds for the last phase of cooking) and gently stir to mix with other ingredients. Now pour thin coconut milk and salt and bring to a boil. At this stage gently slide in the lightly fried fish slices and cook covered, in medium heat. In between open the lid and slightly swirl the pan to make sure that fish pieces are fully covered in coconut milk and they do not stick to the pan. Once it starts boiling, reduce the heat and cook till fish is done. At this stage, add the thick coconut milk, blend well, adjust the salt, tear some curry leaves and add; let it cook in a low flame without the lid for around 5 minutes, till a light coating of oil appears on top; Now add the 3-4 reserved thin rounds of tomato and cook for about 3-4 minutes or until tomato slices are partly cooked. Sprinkle ½ tsp vinegar and turn off the stove and let the dish rest for 20-30 minutes.
- Serve the fish pieces with gravy, topped with semi cooked thin rounds of tomato on each piece, with white bread or Palappam (laced pancakes) or chappathi (flat breads).
Note: Though I have asked to lightly shallow fry the fish before the actual cooking, it is optional as some in my family prefers the taste of fish cooked directly into the coconut milk and some like me, prefer to cook with lightly fried fish. Follow your personal taste here. Other stewed varieties from this blog:   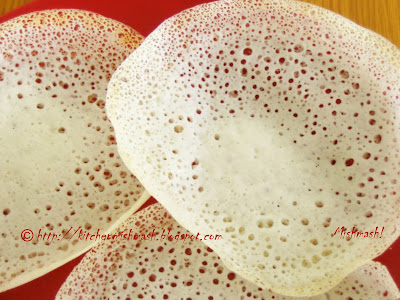 Other seafood dishes from this blog: Luv Shn
|
No part of the content ( articles, photographs, recipes) of this blog may be reproduced without my written permission.Copyright © 2007-2010 Kitchenmishmash.blogspot.com. All rights reserved.
|
|
|
|
|


