|
|
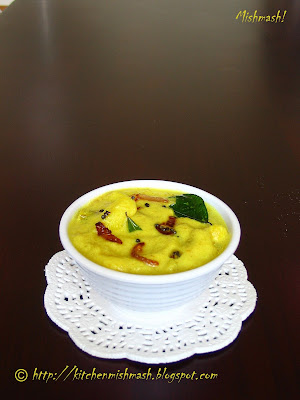
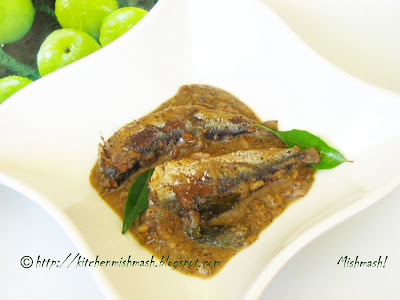 In my last post, I tried to paint the faces of Subaida, Umma and Bappa, some of the yarns in my childhood fabric, who belong to the Kerala Mulsim community and stirred my memories of the rich aromatic food they served, especially during the festival days of Ramzan and wedding ceremonies like Mailanchi Kalyanam and Nikah. From there I introduced you to a more prominent and distinct culinary pocket of Kerala, Malabar Coast, densely populated by Moplahs (Malabar Muslims) who crown the northern coast of our homeland with their flavorful and rich cuisine. Coming from the central part of Kerala, my experience with this cuisine practically starts with Pathiri, paper-thin flat soft rice breads and ghee flavored fried rice called Neichoru and ends with the Kozhikkodan Halwa, which we had a couple years back from the energy packed, 'Mittai Theruvu' in the historic town of Calicut. I remember my mother getting excited at those red and light-yellow colored Halwa and though I politely rejected my share initially, I developed a hidden crush for that melt-in-the-mouth sugar and ghee loaded confection from the moment it touched my palette.The foodie in me always wished for a grandmother from this culinary capital who could teach me some of the traditional Moplah flavours, just like my grandma passed on her legacy to my mother and CJJ's grandma who taught me some of the traditional Kuttanadan specialties. My wishes were answered, when I was recently gifted with a copy of Malabar Muslim Cookery, authored by Ms. Ummi Abdulla. To my very limited knowledge on cookbooks available in Moplah cuisine, I think this book is considered a Bible on Malabar Muslim specialties ;( Please correct me if I am wrong). This book is a treasure house of authentic and traditional Moplah recipes that features Meen Pathiri - steamed rice pie with spiced up fish, Alisa- wheat porridge with meat, Meen kakkathilakkiyathu – Fish masala, Unnakkayi – boiled banana mashed and shaped into cotton pods and filled with sweet and egg filling, Kalthappam- sweet rice cakes, Muttamala-egg yolk garlands, Kaiveesal-egg jalebis along with a variety of Biryani and Pathiri. It has a good collection of vegetarian recipes too. Some of the names are amusing and dreamy at the same like Bariyittathu – Banana finger fries, Nulliyittathu –sweet egg fritters, Thurkkipathil- stuffed mutton pie, Athishaya pathiri- pancake with meat filling etc. Unlike the new-era cookbooks, this book does not offer eye-catching glossy photographs of the dishes featured, which leaves a bit of vagueness especially if the reader has no idea about the recipes under discussion. Some of the recipes are illustrated through sketches That said, I must note that the recipes are presented with precise instructions which are easy to follow and the ones I have tried have come out well with a ‘home-style’ taste. This is a humble cookbook which has a very good collection of authentic recipes but this would have been a classic read, had the author laced the recipes with some family anecdotes and taste memories to get a glimpse of the Moplah lifestyle in a more cozy way!Mathi - Nellikka Varattiyathu is a unique combination dish I tried from this book. Sardines are paired with dried gooseberries and cooked with the other five simple ingredients till dry. Since I did not have dried gooseberries, I substituted the same with frozen gooseberries and served with some gravy instead of making it a dry preparation. This dish was a pleasant change from our regular curried sardines in red gravy or fried preparations. Here’s the recipe:Mathi –Nellikka Varattiyathu(Recipe Source: Slightly changed from Malabar Muslim Cookery’ by Ms. Ummi Abdulla)
Ingredients:
- 6 medium sized Sardines/Mathi/Chaala, cleaned and washed
- 2-3 big Goosberries/Nellikka (Original recipe calls for 2 tbsp dried gooseberries)
- 1tbsp Peppercorns
- 6 medium sized cloves of garlic
- 1 tsp fenugreek
- 2tbsp coconut oil
- 1 sprig of curry leaves
- 1 cup water
- Salt to taste
Directions:
- Grind the gooseberries/Nellikka with pepper to a smooth paste. Crush the garlic. Original recipe calls for dried gooseberries, seeds of which should be removed and soaked in water for sometime before grinding it with peppercorns.
- Heat oil in a, earthenware, ‘curry-chatti’ or in a pan; add fenugreek and when it turns golden brown add the crushed garlic, ground pepper-gooseberry paste and sauté for a minute, in low flame. Tear some curry leaves add 1 cup of water and salt to taste and let it simmer for a few minutes. Now add sardines and cook on low flame till the fish is done. Swirl or shake the pan occasional to prevent the fish sticking to the pan. You can stop cooking when gravy is thick or as the original recipe says, cook till the gravy is almost dry.
Check-out other Malabar recipes of Ms Abdullah I've already blogged.
 
On a separate note, my prayers are with all those who unfortunately come under Hurricane Gustav’s radar and especially for people of New Orleans. We were there just a month back and it was heartbreaking to visit the Katrina affected areas and the scar it left on this place and its people. I cannot imagine how it is for those people to go through such a devastation one more time when the debris from the last hurricane is still a painful reality they live with. I really wish and pray that some miracle happens and weather devil changes it path of destruction and storm loses its strength!
Luv
Shn
|
No part of the content ( articles, photographs, recipes) of this blog may be reproduced without my written permission.Copyright © 2007-2010 Kitchenmishmash.blogspot.com. All rights reserved.
|
 Subaida, Umma and Baappa stepped into my world when I was a toddler, without even realizing that they were becoming a thread in my childhood fabric. When Subaida walked into our lives to baby sit me and later to take care of my toddler brother, she was just a teenager, staying in a small house at the end of our street. She used to call her parents Umma and Baappa (mom & dad) and I guess that’s how we all started addressing the couple in the same fashion. She was an average brown skinned girl with a beautiful smile on her face which gave a natural blush to her otherwise humble face.
It was those mehendi stained hands of Subaida that sprouted my obsession for Mailanchi/Mehendi (henna). They had lots of Mailanchi plants, the leaves of which she stone grounded into a smooth paste and applied on her hands and feet; me and my cousin, G chechi used to be green eyed whenever we saw those bright reddish stains left on her palms as the paste we made never gave results close to hers. Since she knew I was crazy about applying Mailanchi on my hands, Subaida sometimes shared the freshly ground paste with me and my mother. The next day, on my way to school, as always I would catch her either washing vessels or filling pots at the road-side water-tap, wearing a full skirt and a tight blouse and ‘Thattam’, a long scarf covering her head. I was always excited to talk to her on such days to show off the artistic design my cousin or mother drew on my hands, using the paste she gave. I must admit that the modest art work on her hands still had a brighter shade than mine! The secret she shared was adding some sugared lemon juice occasionally on dried up paste! We owe it to Sulaiman, Subaida’s brother who was my mother’s 911 agent for getting her life-saver nasal drops whenever my father was at work and she wanted a refill badly.
Subaida’s Baappa, Saayu as everyone called him, had a pettikkada (small shop) at the main road where we waited for our school bus. That pettikkada served as a shelter for us during the rainy days while waiting for the bus to come. On a desk supported by wooden boxes, Baappa lined soda bottles which came locked with a marble on the bottle neck; glass jars filled with Kappalandi muttai (candied groundnuts), naaranga muttai (candied lemons), lollipops and had some outdated copies of the bi-monthly publications like Mangalam, Deepika hanging from a rope along with the homemade naaranga achar (pickled lemons) sachets Umma made at home. Those kappalandi muttai and naaranga achar sachets always tempted me but it was my brother, a nursery brat at that time, broke my father’s Lakshman Rekha. One evening while walking back from the bus-stop, he devoured those candies and casually informed my father “ Acha, saayu-nte kadayil oru 50 paisa-de ‘pattu’ undu..” meaning, “Dad..I have a 50 paisa debt at Saayu’s shop”. My parents were quite alarmed and amazed at their 5 year old’s ‘cool’ behavior and mastery over the colloquial language!!Baappa earned his living mainly by selling soda sarbath (lemon soda) and Beedi to men coming to pray at the juma masjid (mosque) behind his shop. This mosque was another target of my curiosity as I saw only men coming to the mosque wearing white mundu (wrap-around) and full sleeve shirt, with a hand-kerchief tied on their head, to cover their hair. After washing their hands and feet in a small pond in the compound, I got a glimpse of them kneeling on a mat offering prayers. It was years later I realized that those men were coming for Niskaram (prayer). Baankuvili (call for prayer) was another fascinating mystery to me for a long-long time. Mosque was crowded with men especially during the festival days of Ramadan and Bakrid. Passing by Subaida's house during that festival time was like self-inflicting excruciating pain as the aromatic neichoru (ghee rice) and kozhicurry (chicken curry), which Umma cooked, made unsolicited entry into our nostrils, making our life miserable. We were on top of our excitement whenever we got an invite to attend Subaida’s sibling’s Nikah (marriage) as for us it was not only an opportunity to relish their ghee loaded fragrant Biryani but to experience the orange squash and ariyunda they served at the Mailanchi kalyanam, a function on the previous day of nikah.Subaida, Umma, Baappa are all proud members of the Kerala Muslim community who is renowned for their rich Biryani and meat preparations with a distinct touch. However, there is a sub-group called Malabar Mappilas who crown the northern coast of Kerala with their flavorful and rich cuisine. Though my paternal family, hailing from a historically significant Muslim dominated area, is affluent in northern Kerala specialties like ‘pathiri’, paper thin-soft-flat rice breads, our exposure to Moplah (Malabar Muslims) flavours has always been limited. I started learning about the Moplah style cooking in large scale through blogs like Malabar Spices and Indian Potpourri. Lucky enough, I was gifted with a copy of ‘Malabar Muslim Cookery’ authored by Ms. Ummi Abdulla who is considered the pioneer in introducing Moplah cookery to the rest of the world. Will elaborate more on this book in my next post and for the time being, let me share a classic Malabar recipe I enjoyed from her book:
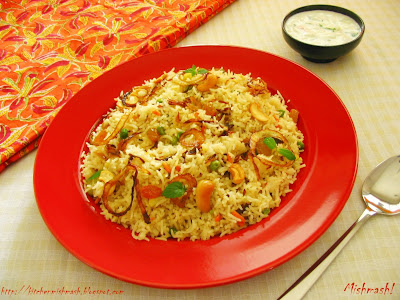
Malabar Style Chemmeen/Prawn Biryani (Recipe Source: Malabar Muslim Cookery’ by Ms. Ummi Abdulla. I slightly changed the measurements and methods to suit my cooking conditions.)

Step 1: Make Biryani Masala/Dry Spice Mix
- ½ tsp fennel seeds
- ½ tsp cumin seeds
- ½ tsp Shahjeera/caraway seeds /Sahjeerakam
- 4 cloves
- 1 cardamom
- 1 flat cinnamon ( 1” inch length)
- ¼ tsp grated nutmeg
- 1 whole mace
Grind everything to a fine powder. This yields around 2 tsp masala but you will require only 1 ½ tsp for making this dish.
Step 2: Cook Flavored Rice
- 2 ½ cups Basmati rice
- 5 cups water
- 2 cups thinly sliced big onion
- Salt to taste
- 3 tbsp ghee
Wash and drain the rice on a paper towel. When it is medium dry, heat ghee in a large skillet and adds thinly sliced onions and sauté till it is transparent. Add rice and stir continuously for 2-3 minutes in low heat. Microwave Method: Transfer everything to a microwave safe bowl with 5 cups of water (2 cups of water for 1 cup basmati rice) and adjust the salt and pop it in the microwave and cook for 23-25 minutes or until rice is done. Stove-top Method: Boil water in a heavy bottom cooking vessel, and when it comes to boil, add all the ingredients and bring it to a boil again and then reduce the flame and cook covered in low-medium heat, until rice is fully done and water is absorbed. Using a fork, gently fluff/separate the rice, so as not to get sticky.
Step 3: Make Chemmeen/Prawn Masala
- ½ kg Chemmeen/Prawn/shrimp, shelled and cleaned
- 1 tsp chilli powder
- ½ tsp turmeric powder
- Salt to taste
- Around ¾ cup Oil for shallow frying Chemmeen/Prawn/shrimp
- 2 cups thinly sliced onions
- 3 tbsp finely chopped ginger
- 3 tbsp finely chopped garlic
- 4 ½ tbsp green chillies (around 15-16; adjust according to your tolerance level)
- 2tsp coriander powder
- 1 1/4 tsp Biryani Masala, powdered earlier
- ½ cup water
- 1 ½ to 2 tbsp freshly squeezed lemon juice
- 1/3 cup fresh cilantro/coriander leaves, chopped
- ¼ cup mint leaves chopped
Make a wet marinade with chilli powder, turmeric powder and salt and apply it on prawns and leave it for 20 minutes in room temperature. Meanwhile grind ginger, garlic and green chillies into a paste and keep aside. Heat oil in a pan and shallow fry Chemmeen/Prawn/shrimp to a light brown colour and remove. Add sliced onions to this leftover oil and sauté till light brown. To this, add the ground ginger-garlic-green chilli paste and fry for another 2 minutes. Add coriander powder, stir well and add ½ cup water and salt to taste. Let it cook till the gravy is thick and at this point add fried prawns, lemon juice, chopped coriander leaves and mint leaves and 1 ¼ tsp Biryani masala/dry spice mix. Stir well and let everything come together for a minute and remove from the fire and keep aside.
Step 4: Layering and Final cooking
- 4 tbsp ghee
- ¼ tsp pinches of Biryani Masala
The final part of the cooking can be done either in a conventional oven or on stove top. Decide on your preferred cooking method and based on that decision, choose your cooking vessel. Pour 2 tbsp ghee into your cooking vessel; spread half of the rice at the bottom, followed by the Chemmeen/Prawn masala and sprinkle ¼ tsp biryani masala; spread rest of the rice as the top layer and drizzle 2 tbsp ghee. Conventional oven Method: Preheat oven to 350 F. Close the oven –safe dish with aluminum foil and cook for 30 minutes. Stove top Method: As per the original recipe, remove half the rice ( from the vessel you cooked rice earlier) to a plate ; pour the Chemmeen/Prawn masala, sprinkle biryani masala and then transfer the rice, set aside in the plate, back to the cooking vessel. Keep a tight fitting lid and cook over very low heat for 5 more minutes. Note: I haven’t tested this method and hence I am not sure of the outcome.
To Serve: After the final phase of cooking, let the dish rest undisturbed for minimum 30 minutes on your kitchen counter. Before serving, stir the entire dish gently, mixing rice with the Chemmeen/Prawn masala and plate it. Serve with Pickle, puli inji, Pappadam and Onion-yogurt salad (Thinly sliced big red onion, 1 small green chilli chopped and mixed with yogurt and a dash of salt) or any one of these condiments.
Cooking schedule I followed:
- Wash and drain the rice
- Marinate Chemmeen/Prawns
- Make Biryani Masala/Dry Spice mix
- Make the chilly-ginger-garlic paste for Prawn masala and get the onions sliced
- Roast and cook rice
- While rice is cooking, make Chemmeen/Prawn masala
- Layering and final phase of cooking
- Serve.
Verdict: We liked this dish and felt it is a Biryani preparation that is designed to highlight the flavour of Chemmeen/Prawns. It does not have the customary frou-frou of caramelized onions, nuts and raisins in between the layers or as garnish and yet it comes out tasty and personally I felt it was more “home-style”. Tasty and Easy to put together on a weekend !
You may also check out
You can check out this picture of pettikkada which looks similar to that of Baappa's.
Luv
Shn
|
No part of the content ( articles, photographs, recipes) of this blog may be reproduced without my written permission.Copyright © 2007-2010 Kitchenmishmash.blogspot.com. All rights reserved.
|
Well, mine is not a Cleopatra yet……Hopefully I will become an expert to bring her home one day :)
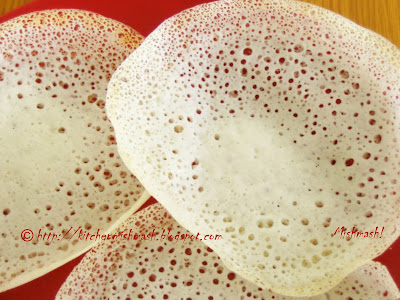  Paalappam is every Keralite’s pride and it is the classic breakfast from the land of coconuts. A hybrid between French crêpes and Ethiopian enjera, Paalappam has a fermented pancake like texture in the centre with a beautiful lace around and to me, it is a symphony in rice flour and coconut milk!It tastes heavenly….it has a texture that melts in your mouth…….and it has a charm and beauty that comes with its crispy paper thin laced edges which equals a bridal veil. This classic has even paved way for some popular local adages like this one below:A marriage match-maker to boy’s mother: Nalla tharavaattukaara……Paalappathinte niramulla penkutiyaa….! ( Girl is from a well-known family…..she is as fair as Paalappam..!)***
This quintessential breakfast of Kerala is thickly woven into our lives and taste memories that it is very common that you will find yourself amidst a discussion like this one here:Menu planning for a betrothal or marriage reception between family members:Uncle: Pinne…..nammal first-course entha kodukkande ennu theerumanicho? ( Did we decide on the first-course?)Father: mm…appavum stew-um aayalo…? ( How about Appam & Stew?)Mother: oru cutlet koode vechalo? …….pinne veg & non veg stew prathekam parayanam ( How about a piece of cutlet too? ……also we should specifically order for both veg and non veg stew)***
Making Paalappam is an art…..it is about ingredients, skill, technique and timing. Right from the quality of the coconut milk used, to the temperature in the room, to the fermentation, to the swirling of the pan, everything plays quite a vital role in bringing out those perfect Paalappam and since the word ‘perfection’ has its own definitions to each home cooks, it is very easy to listen to one of these conversations:A mid-morning telecon between mother and aunt:Aunt: aaah……breakfast kazhinjo ? ennu entha undakkyiye? ( Had breakfast? What did you make for breakfast?)Mother: ohh….ennathe Appam kazhinja pravashyathe pole nannaayilla….( Oh….Appam was not as perfect as that of last time..)***
Is it Paalappam or Velleyappam? Honestly, I don’t know! I don’t know if there is any difference at all or if the difference is based on the method of preparation. I have seen people using it interchangeably and noticed that those from the northern part of Kerala, call it Velleyappam and sometimes those who prepare the batter by grinding raw rice and grated coconut also use the same name. Appam seems to be the shortest and widely accepted nomenclature. Well, the recipe being featured here is Paalappam for sure as the word suggests (Paal means milk) this recipe creates the batter by primarily blending rice flour and coconut milk and use yeast for fermentation. Please note that I am not yet an expert in this area and this is my grandma’s technique and recipe and the proportion I have suggested here is what works for me, based on the weather zone I am in and the cooking conditions I am given. Take this recipe as a framework and make changes to suit your conditions. Also note that the amount of yeast used here also varies depending on the room temperature and quality of yeast.Hardware Pre-requisite: You need ‘Appa-chatti’/ ‘Appam-pan’ which is a round pan with a concave centre and wide sloped edges. Check the model here.
Ingredients: (Serves Two Adults)For ‘Thari kurukku’/Semolina pudding- 2 tsp rava/semolina/cream of wheat
- ¼ cup water
For proofing yeast:- ½ tsp active dry yeast ( I use Fleischmann’s active dry yeast)
- 1/3 cup water
- 2tsp sugar
For batter:- 1 ½ cups rice flour
- 1 ¾ cups thin coconut milk/randaam-paal
- ½ cup thick coconut milk/ thani-paal
- Salt to taste
Directions:- Make ‘Thari kurukku’: In a shallow pan pour water and rava/semolina and cook in medium heat till it is fully cooked, soft and holds together in the consistency of baby food, a semi thick and runny semolina pudding. Keep it aside until it turns cold.
- Proof Yeast: Warm water in a microwave for 15 seconds. Add sugar and yeast; dissolve both the ingredients in this warm water and keep the mixture in a warm place for 15-20 minutes, or until it inflates and foams, creating a ‘dome of foam’, on top of the mixture. I usually keep the bowl inside the microwave itself, undisturbed until it foams.
- Make the batter: Pick a stainless steel or glass bowl big enough to hold double the quantity of batter as during the fermentation process, the batter rises well and it should not over flow from the bowl. In the chosen stainless steel or glass bowl, pour 1 ¾ cups thin coconut milk/randaam-paal and 1 ½ cups rice flour; stir well and mix it into a smooth fine paste like batter, using your hands or wooden spoon and at this stage add ‘thari kurukku’/semolina pudding and blend till it is fully combined with the base mixture . To make this phase easier and less time consuming, I take the easy route of using electric blender; first pour the thin coconut milk and then add the rice flour. With a wooden spoon or spatula, stir well and then turn on the blender for 60-90 seconds or till it forms into a nice paste and then add ‘thari kurukku’/semolina pudding and spin for another 30 -40 seconds. Now pour this back to the big stainless steel or glass container. At this stage, add the yeast mixture and lastly, pour thick coconut milk/thani-paal and blend gently and combine well. If you are using the electric blender, do not add yeast to the blender; add it only after you pour it to the bowl and mix it very gently. Also if batter is too thick, causing problems to the blender, you may add the thick coconut milk in the first stage itself, along with thin consistency milk.
- Fermentation: Once the batter is ready, close it with a lid or plate and then leave in a warm place for overnight or 6-8 hours. The weather zone I am in compels me to heat the oven at 350F for 10 minutes and then switch it off; wait for 30-40 minutes or till it is warm enough to hold my hands inside the oven without any discomfort. At this temperature, keep your batter covered for the prescribed time. By the end of this process, the batter will rise-almost double and you will notice thick foam like ballooning on top and a sharp fermented smell, something like toddy. Ideally, this should be the stage when you check after the prescribed time but if you notice that the batter has risen and then fallen, just ignore it as the end product still comes out well for me, atleast in my case :D
- After the fermentation, bring the bowl to the kitchen counter and sprinkle salt to taste and stir well and let it sit for another 30-40 minutes before you start cooking.
- Make Paalappam: Heat ‘Appa-chatti’ or the non-stick ‘Appam-pan’ at medium. Hold your hand above the pan (ofcourse, not on the pan!) and see if it is medium hot. The pan should not be too hot or less hot. Ladle some batter –around ¼ cup- on the centre of ‘Appa-chatti’/ ‘Appam-pan’ and immediately swirl the pan (holding your hands on both the side handles) in a clockwise motion, spreading the batter to the sides of the pan and when you complete one full circle and bring the leftover batter directly to the centre where you poured it earlier. Swirl the pan only once, else you will not get the customary ‘lace’ of Paalappam. Also swirling is the only way to spread the batter; you should not follow any other method. Once swirling is done, keep the lid and let it cook for 2-5 minutes and at the end of it, the ‘lace’ would be crisp and paper-thin and the centre should be cooked well. If you are using a non –stick pan, the sides will come off easily and remove Paalappam to a plate.
- Cooking time differs depending on the material of the pan, whether non-stick or cast –iron, as well as the heat form, whether flame or electric coil. Flame is the ideal situation because of the shape of ‘Appa-chatti’/ ‘Appam-pan’ as flames touch the entire sides of pan, giving beautiful lace to Paalappam but electric coil also gives satisfactory results like the ones in the picture. If you are using cast –iron pan, do rub some oil with a cotton ball before pouring batter each time.
- Serve with either of the dishes given below. Even a drizzle of freshly squeezed coconut mik, sweetened with sugar or just a sprinkle of sugar makes this beauty melt in your mouth!
Ideal matches for Paalappam :  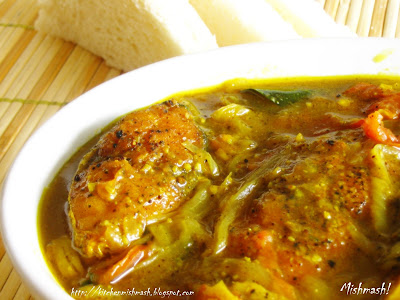 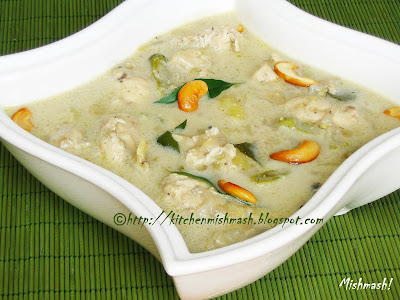  It also pairs well with : It also pairs well with :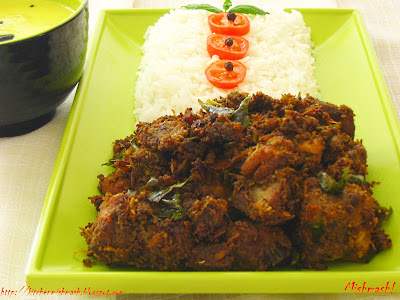 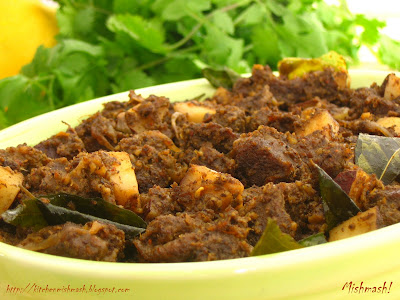   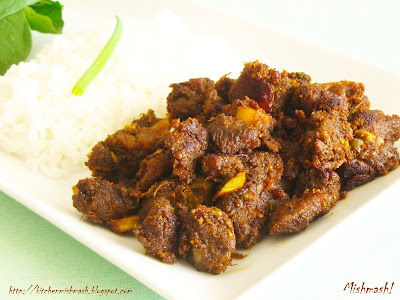 I will update this post with a pictorial at the earliest but right now I am unable to as our camera conked out last weekend and had to dig out this picture from my last years snapshots in the hard disk, since I have been getting several requests for this recipe and did not want to delay it any further. Beginners please keep trying and experiment with the measurements to suit your cooking conditions and weather zone, in particular. Those who prefer golden ‘laces’ may add one more tablespoon sugar but such result is best accomplished on a gas flame stove. This is one dish that is considered a lottery, even by the experienced hands, so don’t be disappointed if you don’t get it ‘perfect’ the very first time. This is one dish that requires lots of skill and patience and above all, a lot of luck too and you have a lifetime to perfect it :) Luv Shn
|
No part of the content ( articles, photographs, recipes) of this blog may be reproduced without my written permission.Copyright © 2007-2010 Kitchenmishmash.blogspot.com. All rights reserved.
|
 After picturing the faces of Shantha and Njondi last weekend, somehow my thoughts were still stuck there, in that neighborhood, like a kid hesitating to return from the seashore. The urban neighborhood, lined with concrete houses on both sides of a well-tarred road, right in the middle of that bustling city where my grandma spent more than 50 years of her life…..the same neighborhood where I spent the formative years of my childhood, mostly on weekends and summer vacations……… it was like standing on the seashore and watching the waves bring back those sunken days and memories of my childhood.From Shantha and Njondi, my mind’s motion pictures rolled back to the face of that young Tamilian belle who used to drop by once in a month or two, selling fresh produce. Whenever grandma asked for unreasonable bargains, she had a wide grin on her face, showing her stained teeth and rosy pink gum, telling my grandma in her own way that she was not going to settle down for that rate. Even when she was tired and tanned, walking in that scorching summer, her face always beamed with glow when she smiled that way, especially during those days when she was pregnant with a baby girl. I don’t remember her name, grandma always used to refer her as Thamizhathi (the one from Tamilnadu) but I still remember her well, wearing a green sari and red blouse with a money pouch tied to her hips, and the coins jiggled when she walked along with her ‘Kolusu’ (anklets), and flowers from the Chemabaka Poo strings looped into her hair danced to her walking pace.The next familiar face that popped up in my mind was the mobile bakery guy who used to come by around 3.30- 4pm in the evening with hot puffs and samosa which we used to have with hot tea. Though grandma used to have in her regular glass tumbler, I insisted the maid to serve me the tea in the pretty delicate ‘VIP guests only’ La Opala tea cup; for some reason I felt tea tasted better in that one!! Then that ice-cream man who came on mid mornings whose cycle bell rang continuously when he neared my maternal house, on his three wheeler cycle cart which had Joy Ice-cream logo painted on the cooler box..............the cotton candy man who passed by our street in the evening and I never missed his melt in the mouth cotton candy which he used to pack in a newspaper cone for 50 paisa onwards……then ofcourse the ice-fruit man who visited the neighborhood at the noon, selling colored ice cubes made with more water and less milk; he was not entertained at our gates as it was rated among the not hygienic stuff we were not supposed to eat.Now when I write this another classic character with her shriveled hands and wrinkled face comes to my mid; my grandma’s long-term maid cum companion, Choochi, a 60+ old Anglo –Indian woman who used to chaperone me after my school hours, whenever I was supposed to come over to grandma’s on weekends for my dance classes. I remember my grandma writing her name ‘Madatheena’, in her expense book and marking her salary against her name. Choochi was popular in that neighborhood because of her signature ‘over-heated langue’ and on the walk back from school, she would chance upon someone she knew in front of John’s tailor shop or at the Khader’s pettikkada ( a small shop). It was from Khader’s shop I used to get my share of Bobanum Moliyum, Poppins and Jeeraka Mittai (multi colored candied cumins)……Then I remember the communist leader, Pappan chettan’s house behind my grandma’s house, her other neighbors Thankamma…..Mable teacher….Rosy whose son was serving his term behind the bars ……then the one and only 14 storied building where stayed the naval officers from northern India and their wives, who always applied bright pink or red lipstick and dyed their hair with henna and always wore flashy Salwars and Sarees. The more prominent of all was the Holy Cross Convent which was just opposite to our house and that was the landmark given for auto drivers…….the nuns always exchanged a smile or had a word with my grandma whenever they met her but I must say that I always felt that they were very stingy with the mangoes they harvested from that huge mango tree, in their front yard which yielded hundred of mangoes every year….. young boys used to try their luck with sling shots when mangoes were in season. Nuns gave a small share of green mangoes to my grandma every year during the harvest……BOOM! Suddenly real life strikes and I happily step into my present……At this point, there is a surge of characters and buildings from that neighborhood that shared a part of my childhood and I can go on and on about those days ….these people may not even remember me but this thamizhathi and the cotton candy man, Choochi and Khader all are characters from a colourful childhood I enjoyed and they will always be part of my cherished memories until the day , lets say, the beast Alzheimer’s attacks me!! Frankly, I dread that day!!!!Well, since my memory tape was paused at the green mangoes from the convent, it kept playing in my head until I noticed some decent green mangoes at the Indian grocery store in our town. And I put it to best use; I paired the sour green mangoes with gentlemanly jackfruit seeds to recreate the classic Chakkakuruvum mangayum thenga arachu vechathu aka populary known as Chakkakuru- Maanga Curry which is green mangoes and jackfruit seeds cooked in a ground coconut base. It is one of those delicacies most Keralites crave for and here is my mother’s recipe to recreate the classic in your kitchen:Ingredients:For boiling:- 1 cup Chakkakuru/jackfruit seeds, cleaned and cut into medium thin strips (I used frozen)
- ½ cup sour green mango, cut into the same size of jackfruit seeds
- 6-8 drumstick pieces of 1 ½ inch length, cleaned and cut (Optional)
- 3 green chillies
- ¼ tsp turmeric powder
- ¼ tsp chilly powder
- Salt to taste
- 1 + 1/3 cup water
For Grinding:- 1 cup grated coconut
- 3-4 green chillies
- ¼ - ½ tsp cumin seeds
- 1 small clove of garlic
- ¼ tsp turmeric powder
- 4-5 curry leaves
- Salt
½ cup water to make the gravyFor Seasoning:- ½ tsp mustard seeds
- 2 dry red chillies
- 2 small red pearl onions
- 1 sprig of curry leaves
- 1 tbsp coconut oil
Directions:- Grind grated coconut, green chillies, garlic, cumin seeds, turmeric powder and curry leaves with a dash of salt into a fine and smooth paste and keep aside. Add some water if your mixer giving you a hard-time.
- In a deep vessel, cook Chakkakuru/jackfruit seeds mildly spiced with red chilly powder, turmeric powder and salt in 1 cup water. When Chakkakuru/jackfruit seeds are almost done, add sliced mangoes and drumsticks with green chillies and add around 1/3 cup water, until everything is cooked well. Mango and drumstick gets cooked fast. To this add the ground coconut paste and pour around ½ cup water or enough to get your desired consistency and bring to a boil in medium heat and turn off the stove immediately as the texture changes badly if u continue to boil the ground coconut mixture.
- In a shallow pan, heat coconut oil and splutter mustard seeds, dry chilly and sauté small onions and curry leaves for a minute and pour it to the curry. Let it rest for minimum one hour for the curry to embrace the sourness of mangoes and blend with the seeds and creamy coconut paste.
- Serve with warm rice. It tastes better the next day.
Check Charline’s take on this classic and have a look at those gorgeous jackfruit seeds. They look pretty compared to my frozen ones but I am glad atleast I got a pack of it!!!! :)LuvShn
|
No part of the content ( articles, photographs, recipes) of this blog may be reproduced without my written permission.Copyright © 2007-2010 Kitchenmishmash.blogspot.com. All rights reserved.
|
|
|
|
|


